 When using Excel it may be necessary to create a series. A series is different than copying the same cell to many other cells. It is very handy when you want to make a numbered list or a list of dates. To make a numbered list: - Open Excel and enter ‘1’ or the starting number for your list in a cell.
- Beginning with this cell, highlight all the cells that will be in the list.
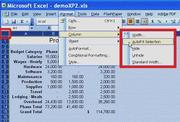
- Click Edit on the menu bar, select Fill from the drop-down list and select Series from the menu that appears. A dialog box opens.
- In the ‘Series In’ section, select column or row depending on how your selected cells run.
- In the Type section, choose Linear.
- In the ‘Step value’, choose how you want the list to count:
If you choose a step value of one, each member of the list is incremented by one and the list becomes 1, 2, 3 etc. If you choose two for a step value, the generated list becomes 1, 3, 5 etc. - Click OK to generate your list.
 Some the text you enter in a cell is wider than the column width setting and it spills over into the column(s) next to it. Autofit adjusts the column width to match the width of the cell with the longest text. - Select the column you want to adjust by placing your cursor over the column heading and clicking your mouse. The entire column is selected.
- Select Format from the menu bar and a drop-down list appears.
- Select Column from this list and a menu opens.
- Select ‘Autofit Selection’ and the column width changes to match the width of the cell with the longest string of text.
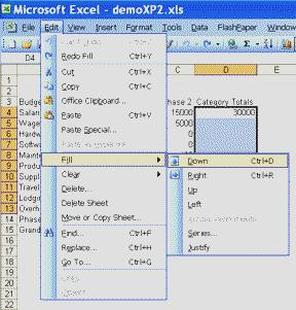 The Fill command enables you to copy the same text or formula in as many cells as you want with just a few simple steps. For example, copy the number 10 in column A of the first 100 rows of a spread sheet: - Begin by entering 10 in the cell at row 1, column A.
- Put your mouse pointer over the cell, hold down the left mouse button and drag it down the column to row 100. Release the button and all 100 cells in column A are selected.
- Click Edit on the menu bar and select Fill from the drop-down menu.
- Select Down from the list that appears and 10 is copied into each selected row of column A.
Note: This works across columns too, except that you would select a row step 2 and choose the Right instead of down from the list in step four.
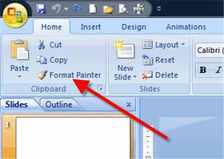 Copy and apply text formatting using the Format Painter in Word, Excel and PowerPoint Located in the Standard toolbar, the Format Painter tool icon (looks like a paint brush) is used to copy the format of a selected object or text to other objects or text. In Word, for example, if you have text formatted in 10pt, Arial Black, you can easily transfer this text formatting to any other text in the document with Format Painter. - Select the text that has the formatting that you want to copy and transfer.
- Click the Format Painter icon. It becomes indented which verifies you’ve selected it.
- With your cursor, which now has a paintbrush attached to it, select the target text you want to format.
- The target text immediately changes to match the format of the original text. As soon as you select the target text, the Format Painter icon becomes inactive.
Note: To make the Format Painter icon remain active so that you can continue formatting text, repeat steps 1-3, except this time in step 2, double-click the icon. When you are done formatting you must click the icon again to deactivate it; otherwise you will continue reformatting any text you select.
Every time you access web sites on the Internet, temporary files are copied to your PC. These files contain information intended to make these web sites open faster on your next visit. They may also contain preferences you've entered on the site while visiting it. All well so far. Over time, however, you can build up thousands of these files. Many of them may not be doing you much good, especially if they are from sites you've visited once never intending to go back. Every once in a while, you should go in and clean these files out. Here's how you do it: - In Internet Explorer click Tools, and then click 'Internet Options'.
- Select the 'General' tab and find the 'Temporary Files' section half way down the page.
- Click the 'Delete Files' button and in the window that opens, check the box for 'Delete all offline content'.
- Click OK and all the files are erased.
Every time you delete a file on a PC running a Windows Operating system it isn't really deleted. It is instead stored in a temporary holding area called the Recycle Bin. It stays there until you restore it or permanently delete it. From time to time it is a good idea to go and delete the files you have no intention of restoring. To delete all the files in the Recycle Bin do the following: - Locate the Recycle Bin icon on your desktop and double-click it.
- When the Recycle Bin opens, click 'File' on the menu bar and a list of options appears.
- Select 'Empty Recycle Bin' from this list and every item in the Recycle Bin is deleted.
You can move icons on the desktop closer together or farther apart. - Right-click anywhere on the desktop. Select Properties and the display properties box opens.
- Click the Appearance tab
- Adjust the number in the Size box and you’ll see the effect of changes, as you make them, in the small display near the top of the window.
- When you have the spacing you want, Click OK to save the setting.
- Right-click anywhere on your open desktop and select Properties from the drop-down list that appears.
- a) For Windows 98 - Select the Background tab in the window that appears and find the section labeled Wallpaper that contains a list of files you can choose to use as Wallpaper.
b) For Windows XP - Select the Desktop tab in the window that appears, and find the section labeled Background which contains a list of files you can choose to use as your Desktop background. - Click on one and it is shown in the small display in the window.
- When you find one you like, click OK to keep as your desktop wallpaper!
Note: If the image does not cover your entire display and you want it to, go to the Display box and select the Stretch option.
As you save, erase, and move files sometimes things do not go just right. This is not caused by anything you are doing wrong. A PC is a very complex, fast machine and despite the best efforts of all the designers, engineers and programmers who've toiled to make it flawless, sometimes programs collide and mess up each others files. This unwanted interaction can result in invalid files, files with lost file fragments, and cross linked files. You don't always know right away when this happens. This is why you should run the Scandisk utility from time to time. For Windows XP and 2000: In XP and 2000, the utility is called 'Error Checking' and doesn't offer the full physical surface check. - From 'Start' double click 'My Computer'.
- Right-click the drive you want.
- Click on 'Properties', then 'Tools'.
- Under 'Error Checking' click 'Check now' and then Start.
- A small scandisk window appears and the process begins.
|
 RSS Feed